Primary keyword: Solar patio lightingVariants: solar lights for patios, outdoor solar lighting installation, patio solar lighting wiring
Audience: Central Florida homeowners seeking reliable, eco-friendly patio lighting.
Pain/benefit: Frustrated by dark patios or high energy bills, readers will learn to install long-lasting, low-maintenance solar lights for warm, inviting outdoor spaces—without complex wiring or heavy ongoing costs.
Upgrading patio lighting once meant extending electrical wiring and accepting higher utility costs. Fortunately, today’s solar lighting systems allow us to create beautiful, functional outdoor spaces with minimal hassle. In sunny areas like Orlando and all of Central Florida, solar patio lights fit right into our design work at GCM Best Services, offering reliable illumination and attractive looks while cutting installation time and running costs. Understanding key installation and wiring considerations makes the process simple, especially when you want both style and practicality.
Outline
- Why solar patio lighting is a smart choice in Central Florida
- How solar patio lighting systems work
- Types of solar lights for patios
- Planning your patio solar lighting layout
- Preparation steps before installation
- Step-by-step solar lighting installation guide
- Surface-mounted vs. in-ground fixtures
- Attaching/placing the solar panel
- Basic connections and wiring (if any)
- Safety and code considerations
- Common mistakes and how to avoid them
- Maintenance tips for long-lasting performance
- Frequently asked questions
- Conclusion & Call to action
Practical solar lighting can completely change your evenings outdoors.
Why solar patio lighting is a smart choice in Central Florida
Here in Orlando and the wider Central Florida area, we get over 230 sunny days per year. That makes our region ideal for solar-powered outdoor lighting. Several benefits drive our choice to recommend solar solutions for patios:
- Zero operational electricity costs
- Fast, disruption-free installation (no trenching or extension cords)
- Minimal ongoing maintenance (just occasional cleaning and battery checks)
- Resilience—even after storms or during emergencies, they keep working when the grid goes down
According to the U.S. Department of Energy, outdoor solar lighting systems are easy to install and largely maintenance-free. Solar patio lights harness sunlight during the day, then release that energy as steady illumination at night. And with Florida’s robust sunshine, they’re a reliable option nearly year-round.
How solar patio lighting systems work
Solar patio lighting relies on a simple but clever system. On each fixture, a solar panel collects sunlight and converts it to electricity, which is stored in an integrated rechargeable battery. As daylight fades, a photosensor triggers the LED lamp to turn on, using the stored energy for several hours of outdoor lighting.
Most systems use LED bulbs because they sip energy and provide a pleasant, long-lasting light. The batteries typically last 1–3 years before needing replacement. Some advanced solar patio lighting systems feature lithium batteries that provide even longer life and more consistent performance.
Key features of modern solar lighting systems:
- Automatic dusk-to-dawn operation (photosensor based)
- Robust weather-resistant housings suited for Florida rain and humidity
- Tunable color temperature: warm white, bright white, or color-changing
- Optional motion sensing for extra security or energy savings
- Standalone or multi-light sets with shared solar panels
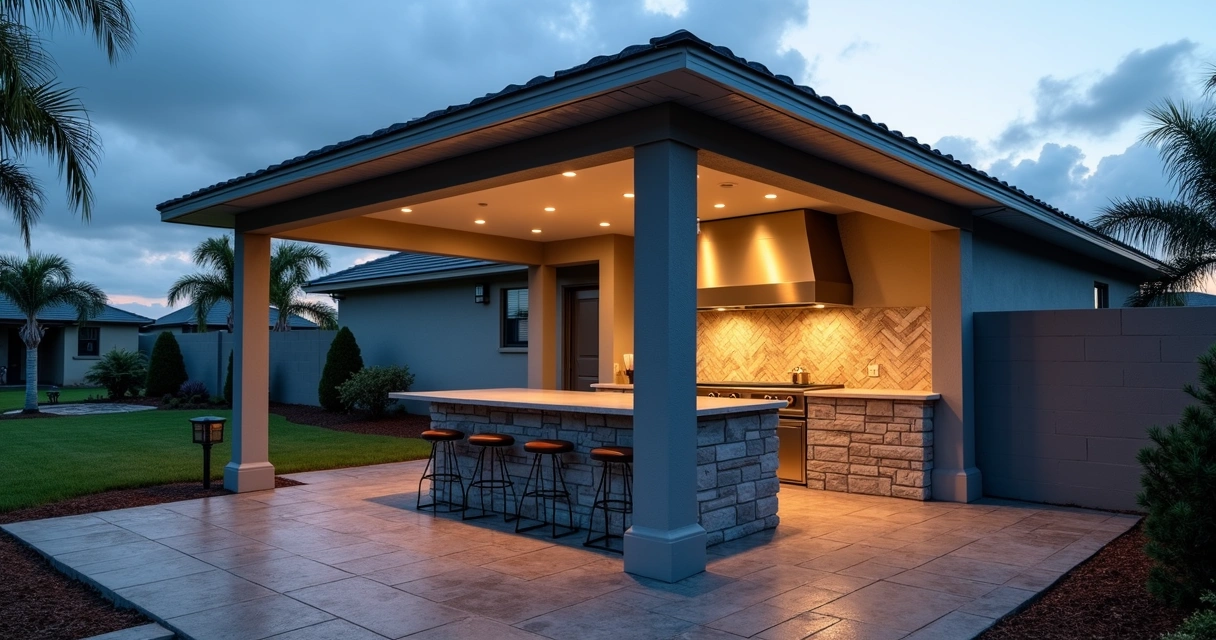
At GCM Best Services, we’ve seen how these design improvements, paired with Florida’s abundant sun, make solar patio lights dependable for our clients—from screened pool enclosures to concrete patios and paver walkways. You can see outdoor solar options brighten up many local projects, including those showcased in our hardscaping portfolio.
Types of solar lights for patios
We’re often asked, “Which solar lighting style is right for my patio?” Over the years, we’ve worked with many types:
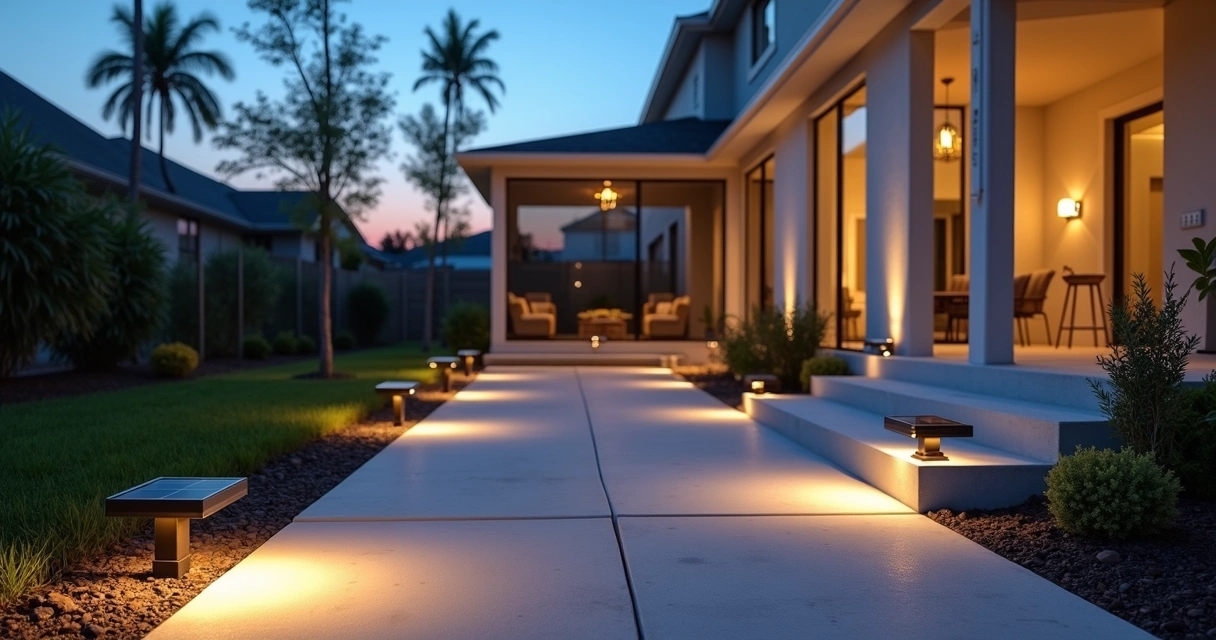
- Path lights. Classic stake-style fixtures to edge walkways, planters, or garden beds. They emit a gentle glow along the perimeter or through planted landscaping.
- Wall-mounted sconces. Perfect for casting focused light beside entryways or doors. Most models include attached solar panels above the sconce for easy recharging.
- String or fairy lights. Create ambiance with LED strands, ideal for wrapping railings, trellises, or pergolas. Usually powered by a single solar panel and battery at one end.
- Deck and step lights. These low-profile fixtures can be surface-mounted on stairs, railings, or deck edges. They help prevent tripping hazards and provide an appealing accent.
- Post and pillar lights. Install on top of concrete posts, fences, or hardscape columns for classic illumination.
- Floodlights and spotlights. These deliver brighter, directional lighting, good for security or showcasing features like summer kitchens or ornamental trees.
The main difference isn’t just the style—it’s also about mounting and wiring. Some are entirely wireless and self-contained, while others have a separate solar panel connected by a short wire, allowing the panel to be mounted in a sunnier spot.

Planning your patio solar lighting layout
Planning is everything. The best patio lighting layouts balance function—enough light to move around safely—with the right mood for relaxing or entertaining. In our work at GCM Best Services, we take a methodical approach. Here’s how we suggest homeowners plan their solar lighting design:
- Map out nighttime traffic areas: stairs, paths, entrances, dining spaces, and seating zones.
- Identify any dark safety hazards needing brighter or more direct lighting.
- Factor in landscaping: Shrubs or trees can shade lights or solar panels.
- Decide which areas you want softly illuminated versus those where you want a spotlight effect.
- Consider power: Where on the patio will sunlight hit longest? South-facing areas are best for placing solar panels or fixtures.
Remember to distinguish between ambiance lighting (for atmosphere) and pathway lighting (for navigation). Mixing both gives you functional evening spaces and inviting style. If you want more tips on concrete patio placement or how to integrate lighting into hardscapes, take a look at our hardscape solutions.
Preparation steps before installation
Before a single fixture goes in, a little prep work sets the foundation for years of enjoyment. In our experience, good preparation reduces issues like shading, short battery life, or unsteady fixtures.
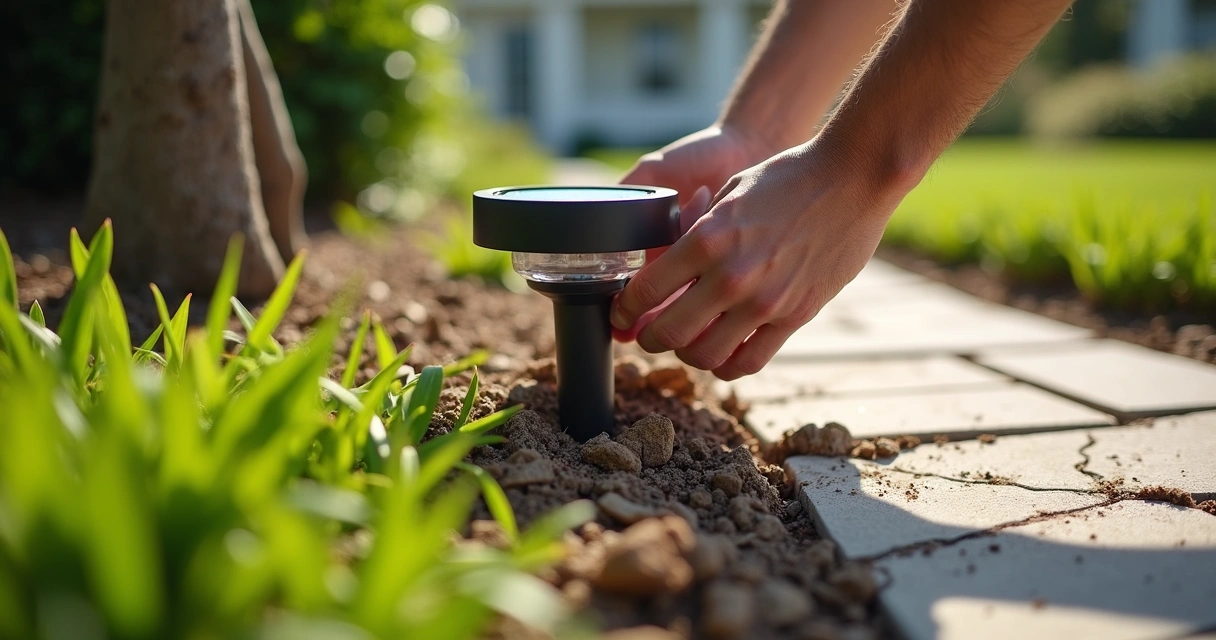
- Survey for sunlight. Stand in your patio space early in the morning and again in mid-afternoon. Note which areas stay sunny the longest. Solar panels will need at least 6–8 hours of direct sunlight per day for best results.
- Check your surface. Whether you have concrete, pavers, turf, or a composite deck, make sure the mounting area is stable and level. For paver projects, proper compaction is vital—get tips from our paver installation guide.
- Gather your tools. Most solar lights need only basic hand tools for installation: a cordless drill or screwdriver, maybe a masonry bit for concrete, a tape measure, and sometimes a shovel for inground models.
- Read the instructions. Solar lights may seem simple, but small differences in battery placement, panel orientation, or switch settings matter.
Avoid skipping the prep. Each step helps us tailor lighting to match your patio’s construction, whether concrete, pavers, artificial turf, or even a summer kitchen cocktail zone.
Step-by-step solar lighting installation guide
Now for the main event: putting those lights in the ground (or on the wall, post, or pergola). Each type of solar fixture is installed a bit differently, but the basic steps look like this:
Surface-mounted vs. in-ground fixtures
For patios with hard surfaces (concrete, pavers, or tile), use surface-mounted or wall-mounted lights. These usually screw directly into the material. Double-check for hidden pipes or wires beneath.
For landscaped zones or garden bed borders, stake lights and inground fixtures push into the soil. Make sure the soil is compacted and drainable to prevent shifting.
Attaching or placing the solar panel
Self-contained models have a small panel on top. For larger or shadier patios, select fixtures with remote panels. Run their short cables along a wall, under a trim piece, or tucked beneath pavers to position the panel in full sun, typically facing south or southwest for maximum daily exposure.
Good sunlight is the secret behind bright solar light.
Basic connections and wiring (if any)
The best part? Most solar patio lights require no complicated wiring at all. The battery and light are usually connected with a simple plug or snap connector. For multi-fixture kits or solar string lights, you may run a small, low-voltage wire from each light to a central solar panel or battery pack. Just secure any visible cables with outdoor-rated clips or adhesive channels to avoid trip hazards or pinching.
Safety and code considerations
Solar patio lights operate at low voltages, usually under 5V DC. They do not pose the same shock risk as standard hardwired lighting, so you don’t need conduit or electrical permits for most installations. Still, we encourage you to:
- Double-check code requirements for historic homes, multi-family dwellings, or commercial spaces.
- Never attempt to modify or hardwire solar lights to 120V lines; use only the equipment provided.
- If attaching to masonry or concrete, use proper fasteners to avoid cracking the surface (see tips in our concrete installation resource).
Always install fixtures so rain can drain away, and never submerge solar lights unless specifically designed for in-ground, wet-area use. For pool decks or spillover zones, pick models with a UL wet rating.
Common mistakes and how to avoid them
After years of installing patio lights in Central Florida, we’ve seen (and fixed) every mistake in the book. The issues we encounter most often include:
- Placing lights or panels in shaded areas (reducing charge and brightness at night)
- Leaving cables exposed where they can be tripped over or damaged by yard work
- Skipping battery replacement—solar lights dim or go out, even if the panel is still working, when the battery reaches the end of its usable life
- Failing to check the "on/off" switch or test mode: Many models ship with a safety switch off, and users forget to activate them after installation
- Trying to flush-mount outdoor lights into improperly graded patios or walkways, which can result in water pooling and fixture damage
The best way to avoid these problems is simple: Plan for sun exposure, double-check your instructions, and start with a clean, level mounting surface. For more information on landscape and hardscape integration, see our complete patio maintenance tips.
Maintenance tips for long-lasting performance
Today’s solar patio lights are built for Florida’s tough outdoor life, but no outdoor product is completely maintenance-free. In our experience, regular upkeep maximizes reliability and keeps your patio looking its best.
- Wipe the solar panels every few weeks with a damp cloth. Dust, pollen, or bird droppings can reduce the charging rate considerably.
- Inspect for shading as trees and shrubs grow over time—trim anything that shades panels.
- Replace batteries every 1–3 years, depending on the model and brand.
- Check mounting points quarterly to be sure fasteners are tight, especially after heavy storms or wind events.
- Remove debris (like fallen leaves) from path and deck lights to prevent lens staining or overheating.
A little routine care keeps your solar lights sparkling—year after year.
For patios with heavy foot traffic or active families, LED lens covers can be replaced if scratched up. And if any light fails to work after a battery change, check the photosensor for blockage. Sometimes a spider web or dirt is enough to keep a light turned off by mistake.

Conclusion: Enjoy your patio evenings with simple solar lighting
Solar patio lighting brings beauty and safety to outdoor living—without digging, power bills, or complicated systems. With the right placement, basic prep, and a bit of routine maintenance, you’ll have a space that’s both practical and inviting. We’ve seen firsthand at GCM Best Services how solar lights can highlight patios, pathways, paver borders, and screen enclosures just right for Central Florida life.
If you want expert help integrating solar lighting into your next project—whether it’s new pavers, resurfacing, screen enclosures, or even a summer kitchen—our team is here for you. Your comfort and convenience outdoors shouldn’t wait.
Ready for a professional quote? 📞 (407) 250-1948 • 24–48h • Orlando, Tampa & area. Reach out today to see how GCM Best Services can help you brighten up your patio and make the most of every Florida evening!
Frequently asked questions
What is solar patio lighting?
Solar patio lighting refers to outdoor lights specifically designed for patio areas that use small solar panels to collect sunlight and charge internal batteries during the day, powering LED bulbs automatically at night. They are available in various forms such as string lights, sconces, post lamps, and path lights, and are known for their cordless, easy-to-install design. They provide eco-friendly, reliable lighting without tapping into your home’s electrical system, making them a popular choice for patios and outdoor spaces.
How to install solar patio lights?
To install solar patio lights, first select locations with the most sunlight, as proper exposure ensures optimal charging. For stake lights or ground fixtures, push them firmly into level, well-draining soil. For wall or post-mounted models, attach them securely with screws or mounting brackets. If your lights use a remote solar panel, mount the panel in direct sunlight and route the attached low-voltage wire to the lights, keeping it tidy and out of footpaths. Check manufacturer instructions, switch the lights on, and monitor for proper function after sunset.
Is wiring needed for solar lights?
Most solar patio lights are completely wireless, containing a built-in panel, battery, and LED in a single unit. Some multi-fixture sets or string lights run a small, low-voltage wire from each light to a central solar panel or battery pack—but even these do not require conventional electrical wiring to your home. Installation is quick and requires only basic tools, with no need for electrical permits or hiring an electrician for standard setups.
Are solar patio lights worth it?
Yes, especially in sunny regions like Central Florida. Solar patio lights virtually eliminate electricity costs, require little effort to install, and deliver dependable lighting using renewable energy. They’re well suited for patios, garden paths, decks, and pool enclosures. While their light output may be slightly dimmer than traditional wired fixtures, the convenience and savings make them an excellent choice for many outdoor areas, as also described by the U.S. Department of Energy.
How long do solar patio lights last?
Most solar patio lights last between 2–5 years, depending on their build quality, sun exposure, and battery maintenance. The internal LED bulbs can last over 10,000 hours, but batteries typically need replacement every 1–3 years. Keeping the solar panels clean and free of shading will help maximize lifespan. Premium units with lithium batteries may run even longer before any major maintenance is required.